
Rough puff pastry
Calorie counters read this recipe with caution, it will almost certainly change your waistline.
I discovered rough puff pastry last year and it changed my life, well that part of it spent in the kitchen which is quite considerable. I had made puff pastry once before, but it was a lot of pain for a short lived gain and I never got round to doing it again. Then last year I was watching repeats of River Cottage Spring on more 4 when Hugh explained that the pastry he was using for a mushroom tart was a quick and easy version of puff pastry. Did I hear correctly? Could this be? It sounded too good to be true. I quickly Googled the term and sure enough there it was in black and white ...and blue ...and purple.
The highest ranked link was to Gordan Ramsay’s recipe on BBC good food, so that is the one I first tried, but I’m afraid to say it didn’t really work. This is because he is not specific enough about quite how ‘loosely’ the butter should be rubbed in and, in fact, I think ‘rubbed’ is perhaps a bad choice of words since it implies rather more force than is necessary. Ramsay does note that ‘you need to see bits of butter’, but it is not clear that these bits should be large chunks. So I ended up overworking the butter and didn’t get the layered effect; a somewhat fatal flaw in puff pastry.
After a moment’s doubt (maybe it was too good to be true after all) I did a search on You Tube to see if there were any demos and found this one by Kate Lamont. As I suspected, the problem was the butter. As Lamont demonstrates, the butter barely needs to be rubbed or worked at all. What you want is large chunks of butter held together by the paste made with the flour, water and lemon juice.
Another problem with Ramsay’s recipe is that he does not emphasise the importance of everything being as cold as possible. In fact, he even says the butter should be room temperature. Any self-respecting pastry chef will tell you that the best flaky pastry is always made in the coldest possible conditions with the coldest possible ingredients and utensils. Some even go so far as to advise cooling one’s hands in a bowl of ice and water. My sister’s lovely boyfriend, the King of Windang himself, gave me the Bourke Street Bakery cookbook for Christmas last year, which sheds some light on why this is important:
To create a flaky pastry, you need to work quickly in a cool area while laminating – this is to avoid the butter melting out between the layers ... During this stage you need to handle the dough as little as possible and always lightly, or the heat from your fingers will melt the butter.
So after a little research and some experimentation I have taken the parts of each recipe that work for me and ended up with the following.
Ingredients
Method
Slice the butter into large chunks (approx 2cm squared) and store in the fridge until ready to use.
Sift the flour and salt onto your work surface; if you don’t have a marble slab or stone workbench, a normal mixing bowl will suffice, but you will need to work quickly. I use a metal mixing bowl, which I cool in the fridge for a bit first.
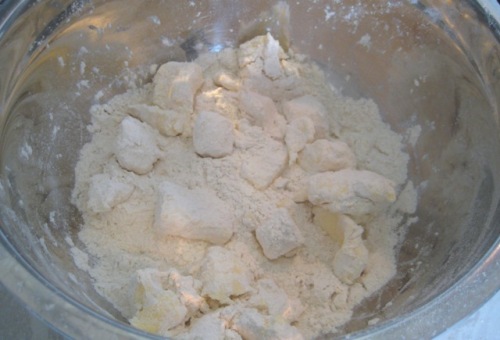
Add the butter to the flour and mix it in very gently with your fingertips, so that it is fully coated with flour, but still in large chunks.
Mix the lemon juice with the iced water and drizzle a little over the mix. The aim is hold the cubes of butter together in a paste of flour, water and lemon juice using as little liquid as possible; you can always add more if you need to, but you can’t undo it if you use too much. When you are able to bring all the ingredients together into a ball, you are done. Wrap it in cling film and put it in the fridge to rest for 30mins. Some recipes eliminate this resting stage, but it is important for keeping the butter firm and relaxing the gluten, which makes the rolling process easier.
Flour your work bench and shape the dough ball into a rectangular block. Roll out the dough in one direction only, until approx three times the length and twice the width, aiming to keep to the rectangular shape. You should be able to see streaks of butter. Sometimes the butter will stick to the rolling pin or work bench, in which case sprinkle a little flour over the part that is exposed.
Fold the top third down to the centre and the other third up over that. If you have sufficient length you can fold the top and bottom quarters so that the ends meet in the middle and then fold in half for even more layers. Give the dough a quarter turn to the right and repeat the process again. I usually do this three times, including the first fold. Sometimes on a warm day I just do it twice to stop the butter from beginning to soften too much.
After the last fold, wrap in cling film and return to the fridge for half an hour before rolling out to use.
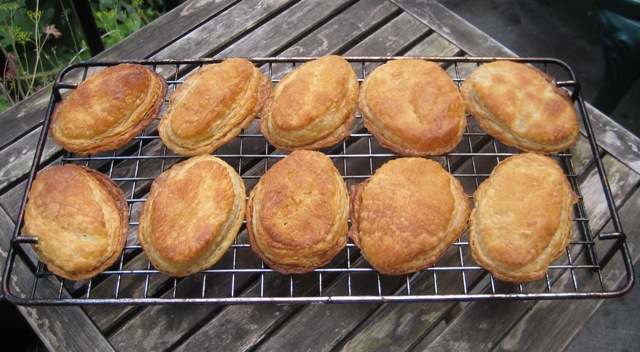
You can use offcuts that have been rolled out later, but you need to stack them on top of each other to preserve the layers. I usually find that most recipes only require half the amount of pastry that this recipe yields, but since I use it often I make the whole batch and cut it in half before rolling it out. I then freeze the other half with any offcuts stacked on top.
Windang Road a Windang.
 Vix
Vix
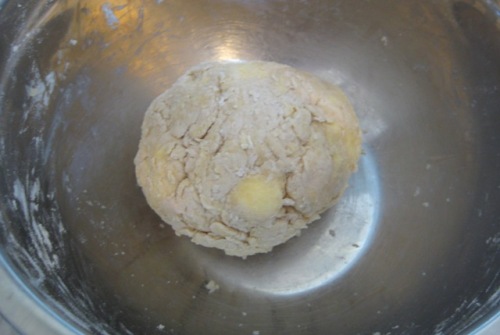
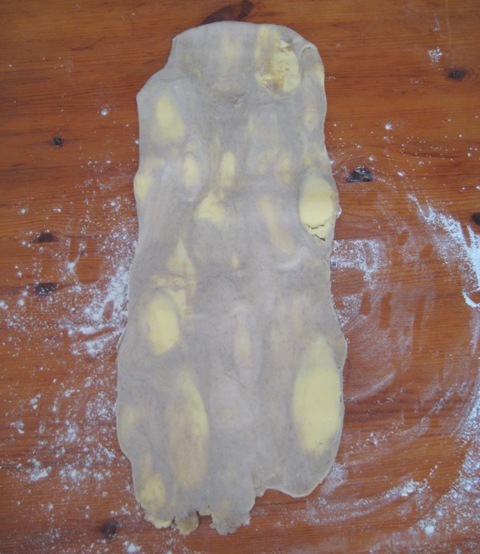
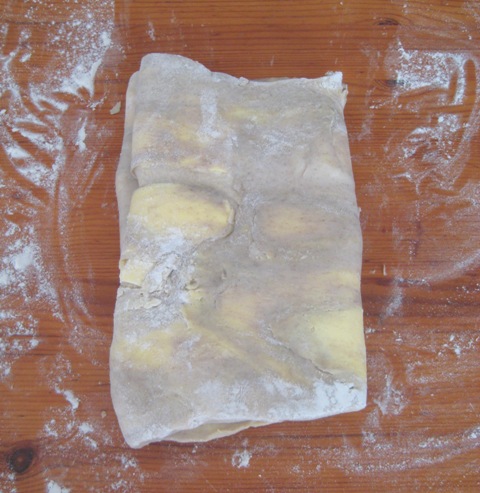
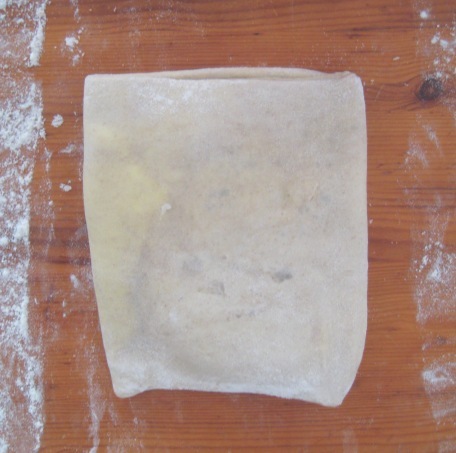
I made puff pastry for the duck pies I cooked last night, so I now have step by step photos of the process. The main thing that it is important to notice is the marbled effect of the butter when it is rolled out.
1. The butter and flour is mixed gently - note that large chunks of butter are still visible
2. Adding the water and lemon juice, gently pulling the flour and butter together
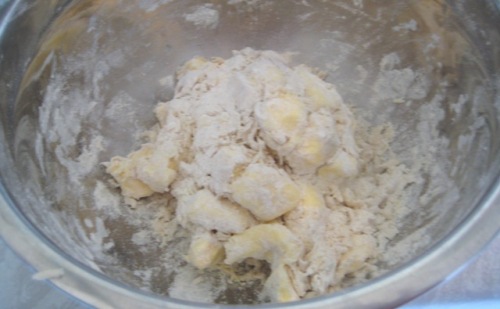
3. The ball of pastry is formed
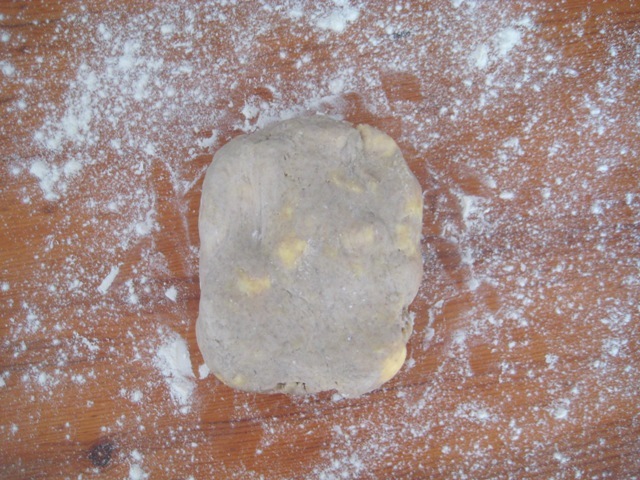
4. Having refrigerated the pastry ball, it is shaped into a rectangle
5. First roll - note the marbled effect
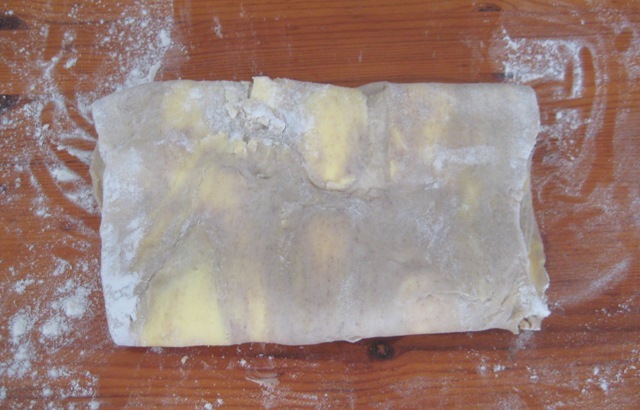
6. First fold

7. Second fold
8. Quarter turn
9. Following a repeat of steps 5-8, the rolling process is finished
Back to the fridge for 30 mins and then ready to roll out for use.
Reader Comments (17)
Having always been scared of anything and everything pastry, I was surprised at how easy it can be when you get a few handy tips. In the last few weeks, I've managed to conquer my fear of shortcrust but have to admit the ominous puff pastry still felt way out of my league.
But with an endorsement from the King of Windang himself as well as your handy tips I think I'm going to have to give this a go!
It is such a pity that people are so scared by pastry. It really isn't as difficult as reputation would have it and, as well as being very satisfying and rewarding to make it yourself, it just tastes so much better than the packet stuff. Like I said though, once you realise how easy it is, it can have dangerous implications for your waistline...
Thanks so much for your step by step pics Vicky!
I made this pastry last night for salmon en croute and it worked perfectly.
Your guides are definitely making me braver on the pastry front.
See you tonight - I will be the spherical one in the corner!
xx
I'm glad you found the pictures helpful and that you are braver for them. Salmon en croute, how lovely. Take a picture for me next time, I would love to see how it comes out.
Would you have more specific information on the underlying principles of rough puff pastry? I can't find anything on the web, and I need this information for an exam.
Thanks! :)
Hi Becca, I am not sure exactly what you are after but if you want to know how it works basically it is trying to replicate the layering process that you go through with real puff pastry. With real puff pastry you encase a block of buttter in dough, roll it out and fold, put in the fridge to rest and then repeat over and over until you have lots of layers of butter and pastry, so that when it cooks it puffs up and separates. Real puff pastry gives you much more even layers than rough puff, but it also takes considerably longer. With rough puff you create the (uneven) layers by leaving big chunks of butter in the dough. When you roll it out you get a marbled effect (see pictures) where lumps of butter are surrounded by dough. As with puff pastry these puff up and separate when cooked, but the result is not so neat as with the real thing.
Wow this pastry was a massive success! I'm a novice cook and love the art of cooking! I've always wanted to make a pie but didn't want to use the store-bought pastry (although, here in the island of Malta, the store pastry is soo delicious), because ANYONE can buy pastry. I wanted to make an authentic pie myself from scratch. Unfortunately, I am not a huge fan of short crust, and puff pastry is my favourite, so I googled puff pastry and was intimidated by the lengthy process of it!! Thank God I research many versions of a recipe before amalgamating my favourites from several variations to create one version of my own. I happened to fall upon your blog and saw this version of puff pastry. I spent around two days searching for other recipes of rough puff, but still ended up using yours. I doubled the recipe (because here in malta we do everything large and we like all our pies to be double crusted). The result was fantastic! I made one large pie and another small one as well as several nutella turnovers. My only disappointment is that the larger pie had a soggy bottom and top (but the outer crust was really flaky and crunchy)! I consulted my mother who said that I must have rolled out the pastry too much to fit the size of the dish! The other pie was perfect though! Thanks so much for your wonderful recipe :) OH and I used the full amount of water and the pastry still came out puffed and flaky :)
Hi Kimmy - so nice to receive your comments all the way from Malta! I am glad your pastry was such a success. With regards to the soggy bottom - your mother has a good point, but I also think that puff pastry does not tend to be the best pastry to use on the bottom. If I make a pie with a bottom crust, I use short crust for the bottom and blind bake it to ensure it doesn't get soggy and then use the puff pastry for the top. Your nutella turnovers sound delicious by the way! :)
Thank you for your reply :) Yes I read that you prefer using shortcrust for the bottom! My mum and grandmother use puff for the bottom and it never turns out soggy, and the second pie I made turned out just fine. I think I might have not let the filling for the first pie cool down enough. I will try it out again in the near future and will definitely use this recipe again. Many thanks for the help and for the explanatory photos. You've helped me alot :) Kim x
Hi Kimmy - well that is good to know, I will have to try puff as a base in the future. I guess it is a case of pricking the base and weighing it down then blind baking, like with shortcrust. Your family recipe gives me confidence. Glad you found the post helpful.
Another variation on this is to use cream cheese to form a pastry crumb and then add the butter to this before rolling it out as per Ramsay & others.When rolling it out use as little flour as possible, keep it all cold (I keep my flour in the deep freeze) and handle as little as possible. A splash of cider vinegar instead of lemon juice works better - it gives a lovely tang, especially when you are using the pastry for apple pies.
Ingredients:
300g strong plain flour
1 tsp fine sea salt
150 g cream cheese cubed at room temperature
200g butter, cubed cold from the fridge
30 ml cider vinegar
about 100ml cold water
Method: Sift the flour and salt into a food processor, add the cream cheese & pulse until well combined. Add the cider vinegar and 2/3 of the water, pulse again until it begins to come together. Do not pulse more than absolutely necessary. Add the diced butter and pulse again very briefly; you need to still see the butter chunks when it’s done. Add more water if needed to form firm dough.
Turn out onto a very lightly floured board, knead gently. Don’t overwork the pastry. Form into a rectangle. Roll the dough in one direction only until 3 times the width. Fold the top third down to the centre, then the bottom third up and over that. If necessary turn and repeat: you need a marbled effect from the butter.
Split into two pieces the same size and refrigerate at least 2 hours before using.
Hi Tony - thanks so much for your great tips and recipe. I am intrigued by the use of cream cheese and look forward to trying it out. Cider vinegar as an alternative with apple pies sounds good too.
So many good comments on my pasties when l used this reciipe, so easy, never again will l use ready made puff pastry, the flavour is totaly differnt, but l must take some credit for the filling.......
june
Hi June, I am so pleased that you have found the recipe useful and easy. Of course you should take credit for the filling, that is the most important bit! :)
thanks for the great recipe and pointers for this pastry.first go and it was amazing!!!! alot easier than i thought it would be and came out great :) glad i came across your pointers because the others didnt have enough pointers.thanks again :) will write that in my recipe book and avoid store bought pastry from now on!
Hi Kimi - so glad you have found this recipe. As per my intro, I struggled for exactly the same reason, not enough pointers. I am glad I have converted another person to make their own. :)
kirdarce e3d3fd1842 https://bharatbarsh.com/neusileale